Android Data Binding: Under the Hood (Part 1)
Let's take a deep dive into how the things work under the hood with Android DataBinding.
Blog by theDroidLady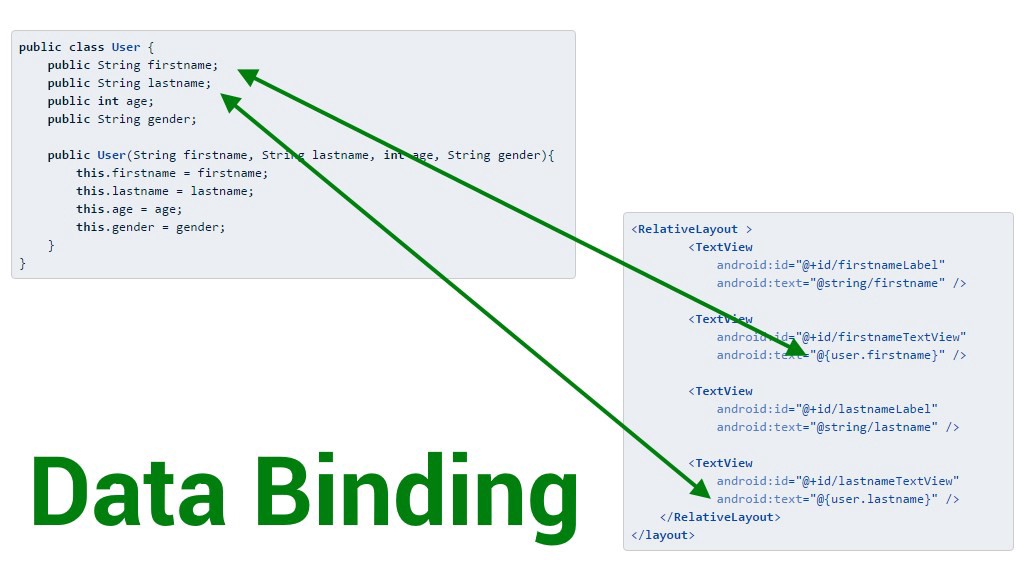
Introduction
From the Android Developer docs,
Knowing how that picture in your mind (or that wireframe a designer gave you) translates into actual layouts and Views is one of those key skills that every Android developer can benefit from. So Now my question is,
Every time, we have to refer the views from these layouts, we use findViewById in our Activity/Fragment. But doing this for a large number of views, create a lot of boilerplate code and there is always a risk of a null pointer exception due to an invalid view ID.
With technology advancements, Android has given us very cool alternatives to be adopted and get rid of these above-mentioned limitations with some performance improvements. But to adopt something for our code or not, we should know how exactly it is implemented:
a) Kotlin Android Extensions: Plugin that will allow you to access views in the layout XML, just as if they were properties with the name of the id you used in the layout definition.
Add this in your app build.gradle:
plugins { id 'kotlin-android-extensions' }
Now you can reference the view ids with the same name they are in your layout files.
Under the hood:
The plugin will generate some extra code (Tools –> Kotlin, called Show Kotlin Bytecode -> Decompile) that will allow you to access views in the layout XML, just as if they were properties with the name of the id you used in the layout definition. It builds a local view cache. So the first time a property is used, it will do a regular findViewById. But next time, the view will be recovered from the cache, so the access will be faster. Check more here.
Well, there are some known issues while using them:
-
They are Kotlin only. :-(
-
Synthetic properties don’t work cross-module. Check this open issue.
-
There are no checks against invalid lookups. We won’t get any error if the id, we just referenced in our class, is not actually there in our layout due to synthetic properties exposing a global namespace of ids which are unrelated to the layout.
b) View Binding: It generates a binding class for each XML layout file present in that module. An instance of a binding class contains direct references to all views that have an ID in the corresponding layout.
Add this in your app build.gradle:
android {
    ...
   buildFeatures {
     viewBinding = true
   }
}
Now, just use binding instance and you will get the view references in camel casing just the way a coding standard says. :-)
c) DataBinding: With ViewBinding, you can’t use it to bind layouts with data in XML (No binding expressions, no BindingAdapters nor two-way binding with ViewBinding). For that we use DataBinding. Just the same way, add this your app build.gradle:
android {
    ...
  buildFeatures {
    dataBinding = true
  }
}
Wrap your layouts with
From the above, We can deduce that:
-
ViewBinding = Only binding views to code
-
DataBinding = Binding data (from code) to views + ViewBinding (Binding views to code)
There are many other differences as well. Check here and choose wisely. :-)
I am using both in my project according to the requirements.
ViewBinding
Under the hood:
If you look at the source code, View Binding is very easy to understand. It will generate one binding object for every XML layout in your module.
Inflate method inside the binding class contains a bind method which eventually calls findViewById for each view to bind. With providing specific id to each view, it ensures the type-safety and annotations like @Nullable or @NonNull helps in providing null-safe types.
DataBinding
A few days back, I looked at the source code for How DataBinding works under the hood and thought of sharing my learnings and understanding through this article.
Implementation
DataBinding internally uses Annotation processor to generate bindings and set other properties.
In Kotlin, annotation processors are supported with the kapt plugin. Add this in your app build.gradle:
apply plugin: 'kotlin-kapt'
android {
    ...
  buildFeatures {
    dataBinding = true
  }
}
Now, we know how to enable this in our module. Let me show you a basic sample:
<layout xmlns:android="http://schemas.android.com/apk/res/android"
    xmlns:app="http://schemas.android.com/apk/res-auto"
    xmlns:tools="http://schemas.android.com/tools">

    <data>

        <variable
            name="user"
            type="com.sample.myapplication.User" />
    </data>

    <androidx.constraintlayout.widget.ConstraintLayout/>
    <!-- UI layout's root element -->
</layout>
Annotation processor searches for
tag in your project and if it finds the outer tag as then, it generates the binding class to access the layout’s variables and views.
Now, What about the other tags??????
- data: A container for variables used inside the layout file. You will be using the variables defined inside to work with various attributes in your layout like for setting the data in your views or if you want some import statement for some expression:
<import type="android.view.View" />
- variable: describes a property that may be used within this layout.
Android studio provides automatic conversion from regular data binding layout by clicking alt+enter on root element. Later, you will get an option to convert to data binding layout and if you click enter, it automatically adds
and tags.
This is how my User class looks like:
data class User(
    var name: String,
    var profession: String
)
And, how I have used it to bind data in XML:
<?xml version="1.0" encoding="utf-8"?>
<layout xmlns:android="http://schemas.android.com/apk/res/android"
    xmlns:app="http://schemas.android.com/apk/res-auto"
    xmlns:tools="http://schemas.android.com/tools">

    <data>

        <variable
            name="user"
            type="com.sample.myapplication.User" />
    </data>

    <androidx.constraintlayout.widget.ConstraintLayout
        android:layout_width="match_parent"
        android:layout_height="match_parent"
        tools:context=".MainActivity">

        <TextView
            android:id="@+id/name"
            android:layout_width="wrap_content"
            android:layout_height="wrap_content"
            android:text='@{user.name}'
            app:layout_constraintLeft_toLeftOf="parent"
            app:layout_constraintRight_toRightOf="parent"
            app:layout_constraintTop_toTopOf="parent" />

        <TextView
            android:id="@+id/profession"
            android:layout_width="wrap_content"
            android:layout_height="wrap_content"
            android:text='@{user.profession}'
            app:layout_constraintLeft_toLeftOf="parent"
            app:layout_constraintRight_toRightOf="parent"
            app:layout_constraintTop_toBottomOf="@id/name" />

    </androidx.constraintlayout.widget.ConstraintLayout>
</layout>
@{} used for one way data-binding means that the view/layout itself will not change the data but the code. We use @={} to let views/layout change data of the object like edittext if user types inside editText we don’t need to fetch details from editText and set it manually this can be done internally by the generated code.
You will see an abstract class named ActivityMainBinding(a subclass of ViewDataBinding class) generated by data binding compiler containing your views and variables.
Check folder build/generated/data_binding_base_class_source_out.
There you will find this @Bindable annotation over your User class Variable:
@Bindable
protected User mUser;
This annotation is used on the getters in order to mention to DataBinding that those classes are going to be binded.
In my MainActivity class,
class MainActivity : AppCompatActivity() {

    override fun onCreate(savedInstanceState: Bundle?) {
        super.onCreate(savedInstanceState)
        val binding: ActivityMainBinding =
            DataBindingUtil.setContentView(this, R.layout.activity_main)
        val user = User("Niharika", "Software Engineer")
        binding.user = user
    }
}
We are pretty much done with the outer implementation. Lets understand the internals now.
Under the hood
In my MainActivity, I have
val binding: ActivityMainBinding =
    DataBindingUtil.setContentView(this, R.layout.activity_main)
DataBindingUtil: A Utility class provided by the data binding framework to create binding from the layout provided.
Here, I got an instance of the class which contains references to the views defined. It also has methods to set the variables that you define in the layout file.
When we write the above line the Databinding util’s setContentView method will get called, which will eventually call the bind method.
static <T extends ViewDataBinding> T bind(DataBindingComponent bindingComponent, View root,
        int layoutId) {
    return (T) sMapper.getDataBinder(bindingComponent, root, layoutId);
}
sMapper.getDataBinder: sMapper is basically a mapper that maps the layout id to the implementation generated by code.
When we build the project, the annotation processor processes the layout files, strips out the data binding specific tags, such as the layout, data, and variables tags. It parses the added expressions and generates Java code to set all the values on the views.
private static DataBinderMapper sMapper = new DataBinderMapperImpl();
After building there will be a file ActivityMainBindingImpl implementation of ActivityMainBinding class generated through DataBinderMapperImpl(class containing logic of mapping layout id to binding implementation).
You can check the generated code located in build/generated/source.
For this line in our MainActivity where I set my user variable,
binding.user = user
I can see some logic written in ActivityMainBindingImpl,
public void setUser(@Nullable com.sample.myapplication.User User) {
        this.mUser = User;
        synchronized(this) {
            mDirtyFlags |= 0x1L;
        }
        notifyPropertyChanged(BR.user);
        super.requestRebind();
  }
-
This mUser is from ActivityMainBinding abstract class and here in ActivityMainBindingImpl, the value sent by me is getting assigned.
-
A long called mDirtyFlags will be updated and they will request for rebinding which will call execute pending bindings and get views updated on the screen.
BR class is the class which is generated by the Data Binding for storing all the reactive values to handle(which are goung to change)
- Every time any variable which getter has the @Bindable annotation and setter has the notifyPropertyChanged() function is going to reflect its new value in the component it is attached to.
This way the user variable with properties has been set and now your layout has it to bind the data. Run your app and see the magic.
In this article, I took static data which was not going to change and showed the internal implementation for it. In my next article, I will talk about the internal logic for data updates in the background, BindingAdapter, action events, expressions etc.
This is all from my side!!
Enjoy reading!! Don’t forget to subscribe for more. :-)