How RecyclerView works internally?
Let's take a deep dive into how the things work under the hood in RecyclerView.
Blog by theDroidLady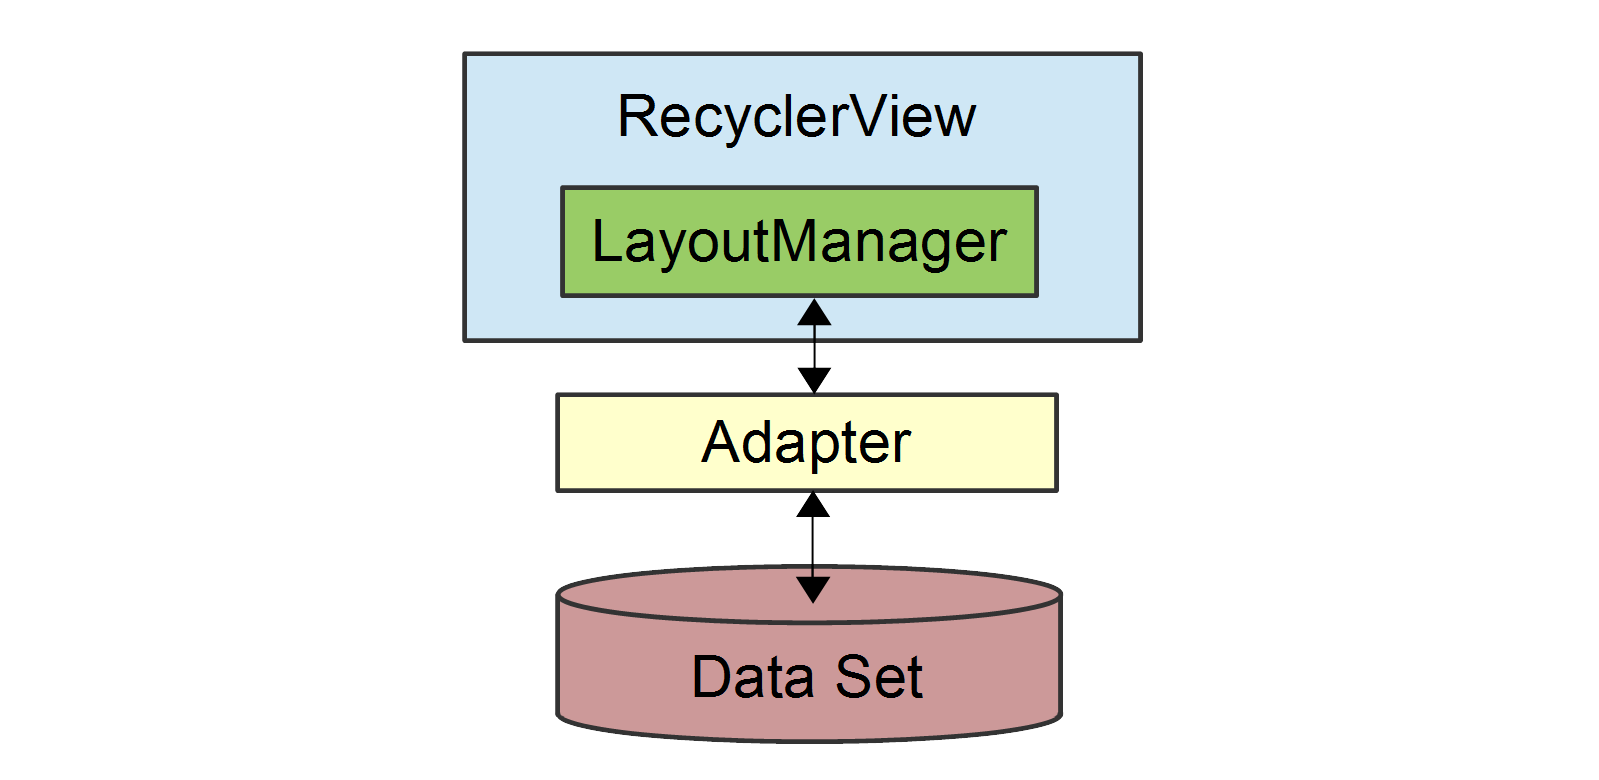
Introduction
Being an Android developer, our life revolves around recyclerViews only. Take a look on your contacts list, photos app, Facebook feed, music app showing a list of tracks, online clothing app showing you a list of products and almost every other app we have in our device is using recyclerView to show a huge set of data to users.
So Now my question is,
Have you ever got curious about the internals, how it actually works, how the data flows and displayed to the user?
Why do we need to know all these factors?
Just think about it: RecyclerView is needed almost in every modern Android app, so the way developers work with it affects the experience of millions and millions of users. We can surely find many good tutorials on how to show data list to users using recyclerView. But, Is that “black box” approach enough to handle a complex scenario where we have millions of Android devices with different rendering and performance issues?
I definitely don’t want my users to have a bad experience for my Home screen(or any other) which currently shows a list of recommended products for them. So, I wanted to know the exact process and flow to make sure I am utilizing the things in the correct approach.
Also, A famous quote about learning is :
“Tell me and I forget, teach me and I may remember, involve me and I learn.”
Wait, Before we move to RecyclerView internals, one should be clear about why it came to existence when we already had ListView.
With ListView, We had some downsides :
-
Lag in Scrolling: ListView has a habit of creating as many views (rows) as there are data items in the dataset. This creation of views and using findViewById() method is a costly affair.
-
No Default Animations Support: ListView comes with no built-support for animations and we devs know how much time it takes to implement a perfect animation.
-
One Scrolling Orientation(Vertical): No Horizontal lists allowed. Only vertical scrolling is supported in ListView.
There are many more reasons other than the above listed which made Android devs realize that something NEW is needed which is highly optimized and comes with great capabilities.
RecyclerView: What it is?
As per Android documentation:
RecyclerView is a UI component which allows us to create a scrolling list. It is basically a new ViewGroup used to render any adapter-based view in horizontal/vertical /grid or staggered grid manner using the Viewholder pattern.
Hold on, many new terms introduced right. Don’t get confused. Let’s understand these:
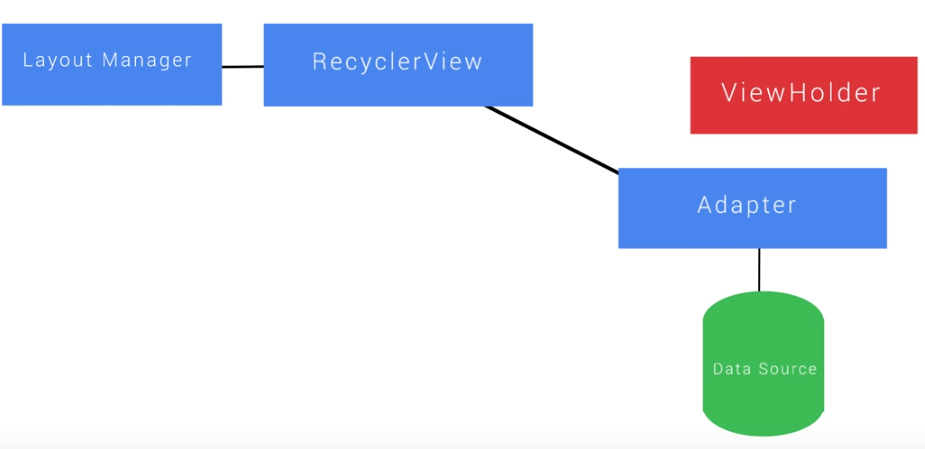
We have 4 major components of RecyclerView:
-
RecyclerView.Adapter: Provides a binding from your app’s data set (which is specific to your app) to item views that are displayed within the RecyclerView. The adapter knows how to associate each item-view position in the RecyclerView to a specific location in the data source.
-
RecyclerView.LayoutManager: Positions items within the RecyclerView. You can use one of several predefined layout managers or you can implement your own custom layout manager. It can be linearly or in a grid.
-
RecyclerView.ItemAnimator: RecyclerView comes with default animations which we can override and change according to our needs. By default, RecyclerView uses DefaultItemAnimator.
-
RecyclerView.ViewHolder: It is mandatory to use with recyclerView and helps us to draw the UI for individual items that we want to draw on the screen.
Let’s understand all these through an example,
Assume, You and I are standing in front of a Burger stall and there is a huge line and at once only 4 members can be entertained. The person making it provides each of the 4 members with one plate and on preparing burgers, he put it on their plate. Another thing what he does is, he kept some plates extra and gave few to the members in line waiting to have a burger in advance and 2 to the members who already finished eating and maybe can ask for the repetition. And then the ones who already had burgers but were holding plates pass the plates to the selling guy so that he can clean them up and give them to the new 2 members in line.

So here, the selling guy is the recyclerView, the plates are the Views, the burger is Data, at once 4 members getting entertained(visible) is termed as Viewport in RecyclerView world and the idea behind using lesser number of plates is our ViewHolder as we can see the person is cleaning them and reusing them as per required. This is the main advantage of using ViewHolder as we are clearing reducing the CPU intensive task of more View Creations.
I hope we are clear with the terminology. Let’s get to the internals now.
RecyclerView: How it works?
Now, let’s understand the process:
So, There is data(item) kept in the data-set(list of items). The adapter binds data to the View and then gives it to the Layout Manager which happens to control the views.
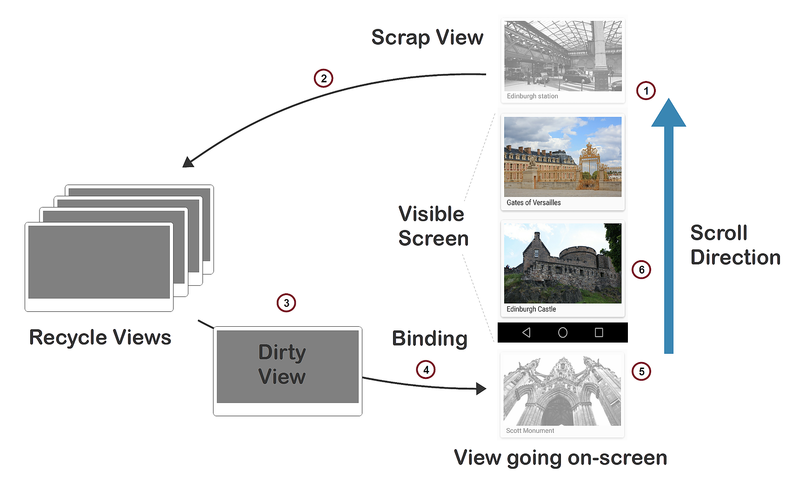
RecyclerView does not allocate an item view for every item in your data source. Instead, it allocates only the number of item views that fit on the screen(Viewport) and it reuses those item layouts as the user scrolls. When the view first scrolls out of sight, it goes through the recycling process as shown in the above diagram:
- When a view scrolls out of sight and is no longer displayed, it becomes a scrap view.
Let’s understand the Scrap view. The Recycler has a Scrap Heap Caching System for these views:
It is a lightweight collection where views can be returned to the Layout Manager directly without passing the view back to Adapter again. This is because the data is still attached to the ViewHolder. So no need to pass it back to the Adapter for binding the data.
Views placed here, are temporarily detached but will be reused within the same layout pass.
The View just above and below the View port are the Detached Views. These views which are detached are expected to be re-attached before code returns.
- When a new item is to be displayed, a view is taken from the recycle pool for reuse. Because this view must be re-bound by the adapter before being displayed, it is called a <>bdirty view</b>.
Same like the Scrap heap, we have another caching system for these type of views which is Recycle Pool:
It is a collection which consists of views that are assumed to have incorrect data (data from a different position or index) also called the dirty view, is always passed to the adapter back so that data can be attached or bound again to the ViewHolder and then returned to the Layout Manager.
Recycler instance is provided to the Layout Manager at some points so that it can obtain new views or recycle old views.
-
The dirty view is recycled: the adapter locates the data for the next item to be displayed and copies this data to the views for this item. References for these views are retrieved from the recycler view’s view holder.
-
The recycled view is added to the list of items in the RecyclerView that is about to go on-screen.
-
The recycled view goes on-screen as the user scrolls the RecyclerView to the next item in the list. Meanwhile, another view scrolls out of sight and is recycled according to the above steps.
Each time the adapter inflates an item-layout, it also creates a corresponding ViewHolder. The ViewHolder uses FindViewById to get references to the views inside the inflated item-layout file. These references are used to load new data into the views every time the layout is recycled to show new data.
RecyclerView: Methods
When you implement an adapter, you must override the following RecyclerView.Adapter methods:
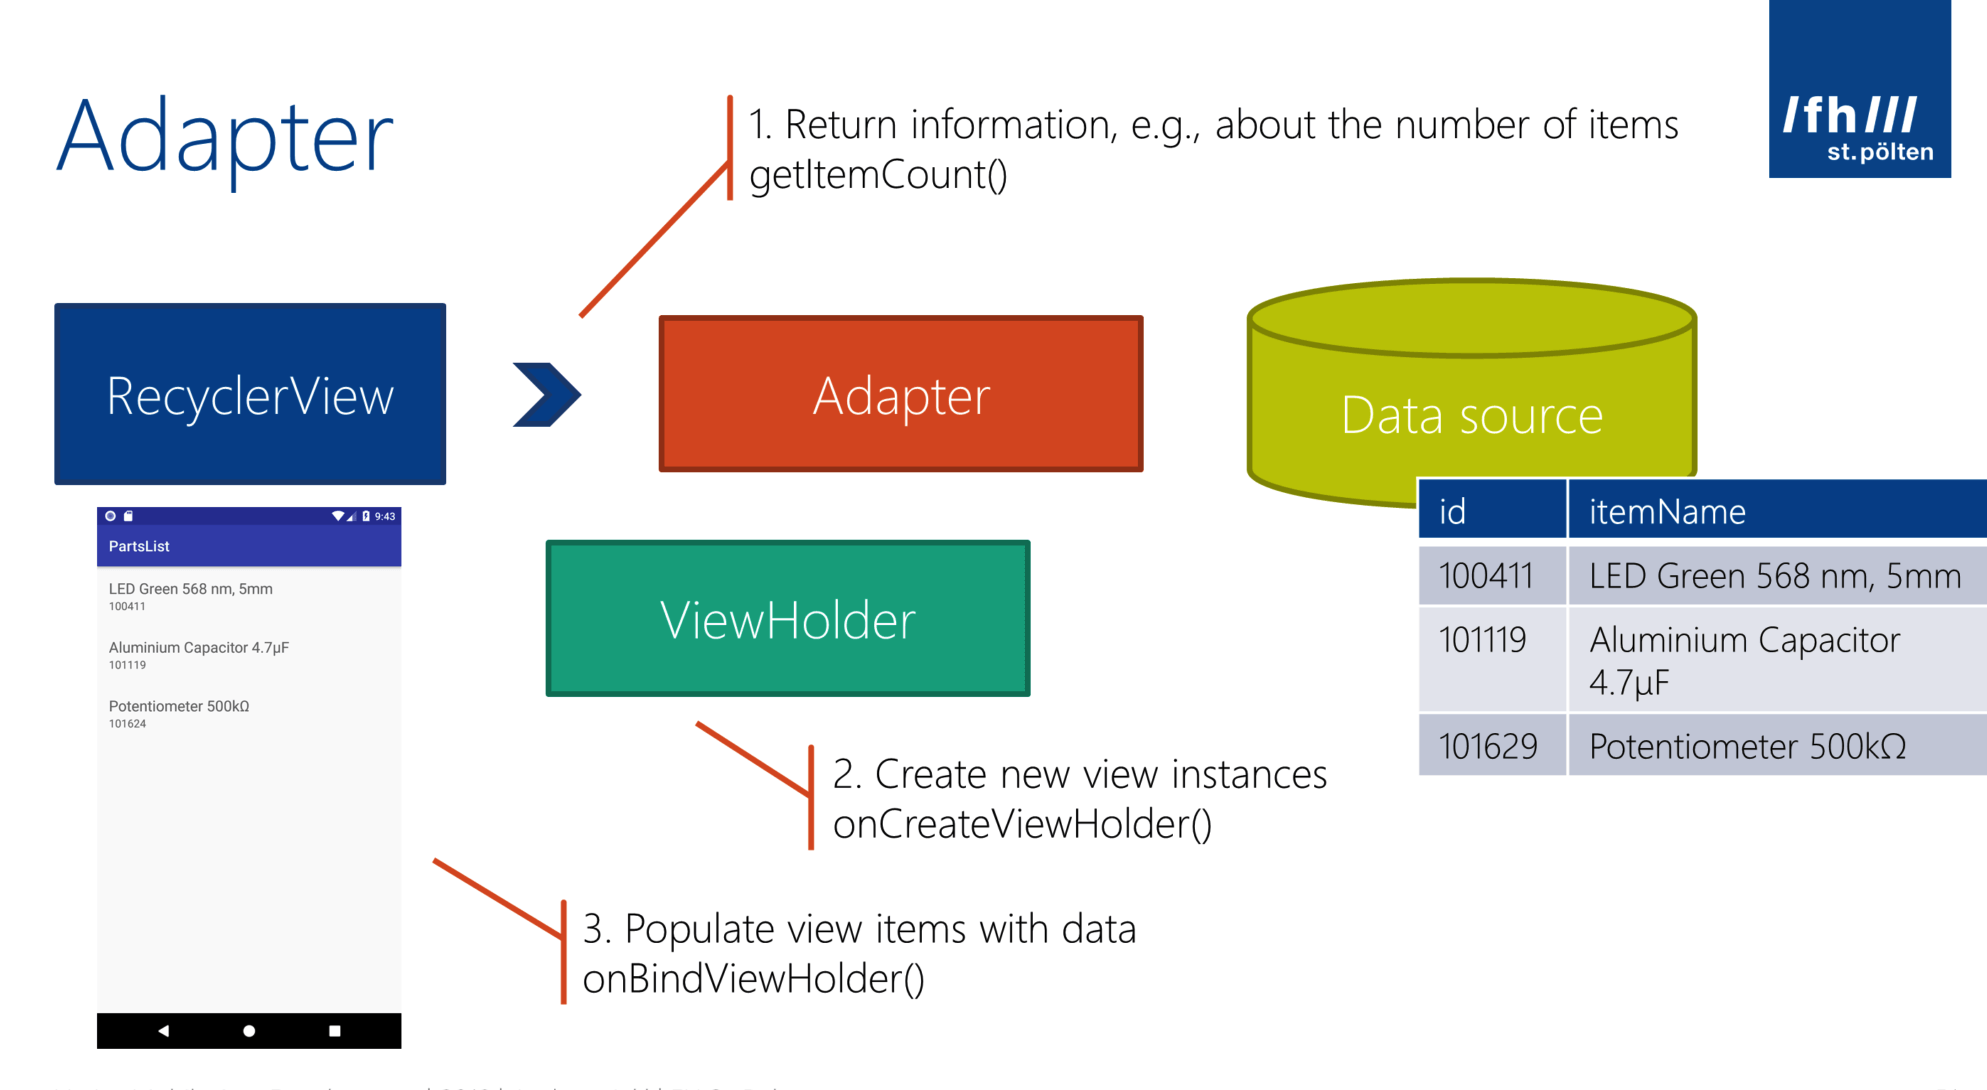
The layout manager calls these methods while it is positioning items within the RecyclerView.
If LayoutManager fails to find a suitable View in all of those places, it creates one by calling adapter’s onCreateViewHolder() method. It then binds the View via onBindViewHolder() if necessary, and finally returns it.
RecyclerView: Notifying changes
-
NotifyDataSetChanged – Signals that the data set has changed (forces a full update).
-
NotifyItemChanged – Signals that the item at the specified position has changed.
-
NotifyItemRemoved – Signals that the item in the specified position has been removed.
Like this we have notifyItemRangeInserted, notifyItemRangeRemoved , notifyItemRangeChanged. Read about these, check your scenario and use them wisely. If you know exactly how your data set has changed, you can call the appropriate methods listed above to refresh RecyclerView in the most efficient manner.
RecyclerView: Some Performance Tips
-
recyclerView.setHasFixedSize(true): If it is possible to set the width and height of the items at the XML file and they don’t change based on adapter’s content, add this line to your RecyclerView Initializing method. By this method, you told RecyclerView to don’t calculate items size every time they added and removed from RecyclerView.
-
recyclerView.setItemViewCacheSize(size): Set the number of offscreen views to retain before adding them to the potentially shared recycled view pool. So when you scroll the RecyclerView such that there’s a view that is just barely completely off-screen, the RecyclerView will keep it around so that you can scroll it back into view without having to re-execute onBindViewHolder().
-
Check how and when to use adapter.setHasStableIds(true)(This can help for the purposes of animation and visual object persistence).
References :
This is all from my side!! I hope you learned something from this article.
Enjoy reading!! Don’t forget to subscribe for more. :-)